Workshop
Syntactic Structure
Introduction
In this tutorial you'll learn to insert statements by typing (instead of command history) and to enhance your scripts with comments and white space.
Preparation
Open Praat and load a couple of sound objects. Load the script from the last exercise (
Exercise
The script from the last tutorial looks like this:
Erase all
Black
Line width: 1
Solid line
Select outer viewport: 0, 6, 4, 6
Draw: 0, 0, 0, 0, "yes", "Curve"
Select outer viewport: 0, 6, 0, 4.5
Blue
Line width: 3
To Pitch: 0, 75, 600
Draw: 0, 0, 50, 600, "no"
Black
Line width: 1
Draw inner box
Marks left every: 1, 50, "yes", "yes", "no"
Text left: "yes", "Frequency (Hz)"
Select outer viewport: 0, 6, 0, 6
Remove
Your first task is to insert a Play statement so you can listen to the sound that is drawn. Inserting statements is straightforward: Place the cursor at the beginning of the line where you want to insert something, press the Enter key to create an empty line, and type the new statement in the empty line. Statements in scripts behave like mouse clicks in the code, i.e. they affect only selected objects. So, where would you insert the Play statement?
Play statement has to be inserted before line 10. Try it: Insert Play somewhere in the first half of the script, before line 10. Run the script—it works fine.
Now insert Play in the line after the To Pitch statement, i.e. line 11. Run the script and see what happens: The first 10 line are execute as before, i.e. the Picture window is cleared and arranged, the oscillogram is drawn and the pitch object is created. Then, the script is aborted and an error message appears:
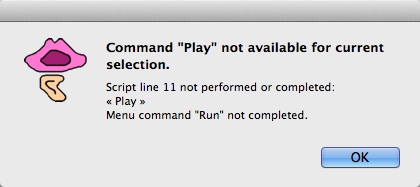
From line 10 on, the selected object is a pitch object and pitch objects can't be played (see for yourself and select a pitch object in the Objects window: there's no Play button in the dynamic menu!). That's exactly what the error message complains about, the Play command is not available for the currently selected object. Additionally, it helps you locating the error by telling you where the script terminated. As expected, the problem is the Play statement in line 11. If you delete the Play statement (or substitute it with Hum) everything is fine again.
Object selection is an important issue in scripting
and there's an entire session dedicated to all aspects of this topic.
The next task is to alter the script so that an intensity contour instead of a pitch contour is generated and drawn. You'll try this without the help of command history. The starting point:
Erase all
Black
Line width: 1
Solid line
Select outer viewport: 0, 6, 4, 6
Draw: 0, 0, 0, 0, "yes", "Curve"
Select outer viewport: 0, 6, 0, 4.5
Blue
Line width: 3
To Pitch: 0, 75, 600
Draw: 0, 0, 50, 600, "no"
Black
Line width: 1
Draw inner box
Marks left every: 1, 50, "yes", "yes", "no"
Text left: "yes", "Frequency (Hz)"
Select outer viewport: 0, 6, 0, 6
Remove
You'll start with line 10. Instead of a pitch object you want to create an intensity object. How would that be accomplished in the GUI? You would select a sound object and click on
With this information you're able to edit line 10 in the script editor. Try it and implement the creation of an intensity object with standard settings.
The necessary steps:
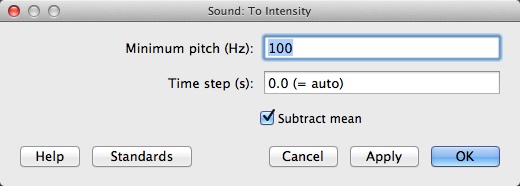
To Pitch:becomesTo Intensity:- first parameter:
100 - second parameter:
0 - third parameter:
“yes”
The final statement: To Intensity: 100, 0, "yes"
Next, the draw and garnish statements must be adapted. Select an intensity object and click on
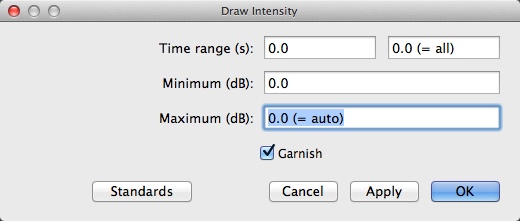
We'll start with the standard settings except for the garnish, which we don't want. In the script editor, go to line 11. The Draw: command can be recycled; just set the 4 numerical parameters to 0. Make sure that the fifth parameter is “no” to prevent the standard garnish.
In line 15, the tick distance of 50 units (before: Hz, now: dB) is to much, try 10 instead. Finally, we'll adapt the axis label in line 16: “Frequency (Hz)” should become “Intensity (dB)”. The result:
Erase all
Black
Line width: 1
Solid line
Select outer viewport: 0, 6, 4, 6
Draw: 0, 0, 0, 0, "yes", "Curve"
Select outer viewport: 0, 6, 0, 4.5
Blue
Line width: 3
To Intensity: 100, 0, "yes"
Draw: 0, 0, 0, 0, "no"
Black
Line width: 1
Draw inner box
Marks left every: 1, 10, "yes", "yes", "no"
Text left: "yes", "Intensity (dB)"
Select outer viewport: 0, 6, 0, 6
Remove
Test the script (don't forget to select some sound object before you run the script) and fine-tune it. For example, if you don't want the intensity contour to touch the diagram frame at minima and maxima, set the third parameter of the Draw command in line 11 to 30 (or less) and the fourth parameter to 100 (or more):
Draw: 0, 0, 30, 100, "no"
The last task of this exercise is to enhance the script with comments and white space. The basic idea is to separate connected blocks of statements and to introduce the blocks with a short explanation of their purpose. And you should always mention the purpose and requirements of the script at the beginning. Remember: Comments are indicated by the hash symbol (“#”) and ignored during execution. Of course, there are many ways to structure and comment scripts, even a simple script like ours—here's a possible solution:
# purpose: draw waveform and intensity contour of selected sound object
# requirements: one selected sound object

# set-up of picture window for waveform
Erase all
Black
Line width: 1
Solid line
Select outer viewport: 0, 6, 4, 6

# draw waveform
Draw: 0, 0, 0, 0, "yes", "Curve"

# set-up of picture window for intensity contour
Select outer viewport: 0, 6, 0, 4.5
Blue
Line width: 3

# generate and draw intensity contour
To Intensity: 100, 0, "yes"
Draw: 0, 0, 0, 0, "no"

# add garnish
Black
Line width: 1
Draw inner box
Marks left every: 1, 10, "yes", "yes", "no"
Text left: "yes", "Intensity (dB)"

# select entire picture and tidy up
Select outer viewport: 0, 6, 0, 6
Remove